How to Publish REST services using Oracle SOA Suite 12c

Hello and welcome!


Continuing our deep dive into the Oracle SOA Suite 12c, we will now explore the new REST adapter! That is something clients have been asking for a long time and it is finally here!

For our test I will create a REST POST web-service that will receive either XML, JSON or URL params and pass them to a BPEL process, so as always we will start creating a new SOA pŕoject:


ScreenshotRESTBPELCreate

After the process is created we will need to design our data structure for our example to work, to do that we will create a new XSD Schema file! Yes, we are creating a REST service, stay with me, we are going somewhere with this, here is my schema:


<?xml version="1.0" encoding="UTF-8" ?>
<xsd:schema xmlns:xsd="http://www.w3.org/2001/XMLSchema" xmlns:vrs="https://vrsbrazil.wordpress.com/RESTSchema"
targetNamespace="https://vrsbrazil.wordpress.com/RESTSchema" elementFormDefault="qualified">
<xsd:element name="restElement">
<xsd:complexType>
<xsd:sequence>
<xsd:element name="name" type="xsd:string"/>
<xsd:element name="dateTime" type="xsd:dateTime"/>
</xsd:sequence>
</xsd:complexType>
</xsd:element>
</xsd:schema>

Important: If you want to create a schema from scratch like I am doing, on the “New Gallery” choose the “XML Schema” option not the “XSD Schema” this one is a wizard for creating XSDs based on file patterns, not covered on this post.

Next we drag a REST Adapter from the Components Palette into the Exposed Services column at the composite.xml, this will bring up the “Create REST Binding” wizard:

ScreenshotRESTBPELWSWizard

At the “Operation Bindings” section, click on the “green plus sign” and then click on  “Add operation binding”, this will bring up the “REST Operation Binding” wizard:

ScreenshotRESTOpBindingWz

At the “Request” tab you will see the options offered for payload: XML, JSON, URL-Encoded and No Payload, we are choosing all BUT No Payload.

You should have also noticed a Schema URL field available, we will click on that one’s search icon and select the  “restElement” element on the XSD we just created. The operation Name and HTTP verb is on the image below:

ScreenshotRESTOpWz2

At the “Request” screen, on the “Payload” section there is a cogs button, this button creates data examples for the payloads we have selected, here are those it created when I clicked:

XML:


<restElement xmlns="https://vrsbrazil.wordpress.com/RESTSchema">
   <name>name44</name>
   <dateTime>2014-07-22T16:06:58.416</dateTime>
</restElement>

JSON:

{
  "name" : "name43",
  "dateTime" : "2014-07-22T16:06:58.415"
}

URL-Encoded:

name=name45&dateTime=2014-07-22T16%3A06%3A58.416

If you want the wizard will save these generated code on your Adapters folder within the project, it can be useful!

Now for our response tab I will also choose our xsd element and choose all data available BUT “No payload” again:

ScreenshotRESTOpWzFinal

We are all set here, click OK to create the operation and OK again on the “Create REST binding” wizard.

ScreenshotRESTBdnCreated

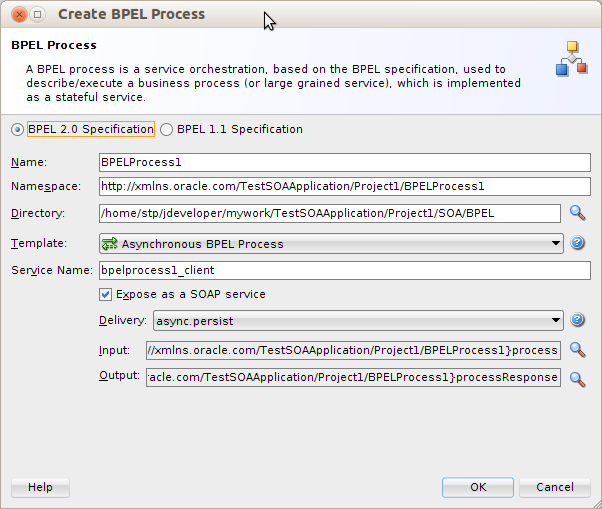
Time to create our Synchronous BPEL process, drag a BPEL component to the composite.xml screen.
On the creation wizard, at the Input/Output section, select our XSD element for both and UNCHECK “Expose as a SOAP Service”:

ScreenshotRESTNewBPEL

Your composite should look like this:

ScreenshotRESTNewBPELComposite

A Mediator is all we need now to link both these guys:

ScreenshotRESTMediatorComp

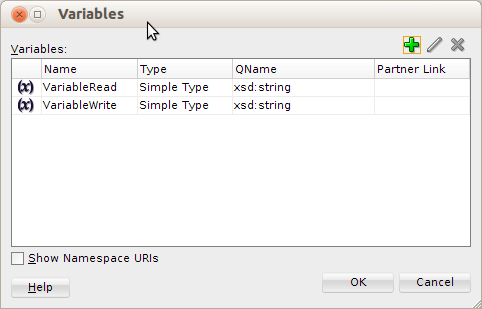
Make sure you assign the payload values for input and output:

ScreenshotRESTMediatorAsgn

And do the same thing on your BPEL process:

ScreenshotRESTBPELAsgn

If your process looks like this you are probably all set:

ScreenshotRESTBPELProcess

Finally we can deploy and test it, lets start with the basic XML Request and XML Response:

ScreenshotRESTXMLXMLTest
ScreenshotRESTXMLXMLTestResponse

Looking good, how about a JSON/JSON Test:

ScreenshotRESTJSONJSONTest
ScreenshotRESTJSONJSONTestResponse

Let’s mix it up a little with a URL/JSON one:

ScreenshotRESTURLJSonTest

Well this is it, hope I could help you!

Thank you,

How to use Subprocesses on Oracle BPEL 12c

Hi!

The Oracle SOA 12c is bringing us a lot of new nice features and one that has really caught my attention is the SubProcess feature.

The SubProcess eliminates the need for writing the same code more than once on the same process or the need to pass the bureaucratic process of creating a new process bpel like the wsdl, BPEL versions (It works with BPEL 2.0 only!), sync/async, etc.

Let’s start our example by creating a new BPEL Process in a SOA Project on JDeveloper 12c:

Screenshot_NewBpel

You will notice that unlike 11g the new default specification for BPEL processes is 2.0, leave it as it is, the new SubProcess feature will work on 2.0 specification only!

Back on the composite.xml, create a new subprocess:

ScreenshotNewSub

When you open the SubProcess, you will see an empty sequence with no receive or invoke actions. You will be able to call this sequence from any part of your BPEL process, even inside a fault handler.

So for an example, my subprocess will read a string variable, concatenate that string value with “Hello ” and assign that valu to another variable. To do that I will create two variables on my process:

ScreenshotSubVariables

Important: you can read/write on multiple variables on the subprocess and they can all be read on the calling main process as we will see later in the post.

We will create an assign activity on the subprocess for our return:

ScreenshotSubAssign

And we assign our hello to the VariableWrite variable…

ScreenshotSubVariableWrite

Our subprocess is set, let us  go back to our main process:

ScreenshotMain

On Components palette, lets a drag subprocess component into our sequence:

ScreenshotMainSub

By double -clicking it you can choose your sub-process and interact with the variables:

ScreenshotMainSubVariables

The Copy By Value Option

As you can see by default the editor sets the variables in the process as “Copy By Value”, that means the main process will fill up the variables with the values you assign to it but any alterations made to those values in the Sub-Process will have NO effect on the variables from the main process.

If you need the value altered by the subprocess to be effective on the variables at your main process you will need to UNCHECK that box, I will do this to my “VariableWrite” as you can see below:

ScreenshotMainSubVarCp

Values to variables  can be either a reference to a variable on a main process or an expression, however if you uncheck Copy By Value it will only accepts reference. This makes sense because you are expected to receive values generated by the subprocess on those.

So for our test I am sending on the VariableRead the string I get in the process input variable and for the Variable Write I will create a string variable on the main process as you can see below:

ScreenshotMainSubVarAsgn

To see the value changed at the of the process I will create an assign to the outputvariable from the returned variable:

ScreenshotMainAssignReturn

Ok, time to test our creation, after deployment, we will have this on em:

ScreenshotEndProcess


Thank you!

How to install Oracle Communications Design Studio 7.2.2.1.0 in a Nutshell

  1. Download the Design Studio at https://edelivery.oracle.com/, I am downloading the 7.2.2.1.0 version;
  2. You will need the Oracle Enterprise Pack for Eclipse (12.1.1.1.0) based on Eclipse 3.8 (Juno), download available at http://www.oracle.com/technetwork/developer-tools/eclipse/downloads/index-086738.html, that page is not rendering correctly on Google Chrome nor IE, there is a logo covering the link you will need to download, it is good idea to use Firefox ;
  3. It is good idea to adjust Java VM variables at the eclipse.ini file to at least 1GB;
  4. Once you have extracted the design studio to a folder, go to eclipse install new software and point to the “update” folder that you can find at the extracted folder;
  5. Select both items and proceed the installation;

That´s it.

You can find the entire detailed manual at https://edelivery.oracle.com/, under Oracle Communications then Oracle Communications Design Studio 7.2.2 Documentation.

Thank you.